
Make these crispy air fryer sweet potato wedges in less than 30 minutes. Serve this delicious side dish with your favorite dipping sauce. Read the full article →
Gluten Free

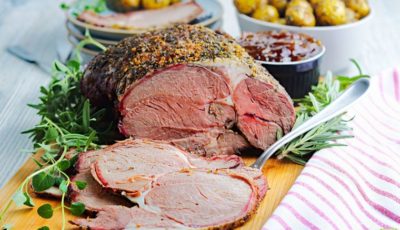
Make this smoked leg of lamb recipe on your pellet smoker for a special holiday family dinner. The smoky flavor compliments most classic side dishes. Read the full article →
This smoked tri-tip recipe uses just a few simple seasonings for maximum results. This recipe uses a reverse sear to lock in the flavor. Read the full article →

This easy Traeger smoked ham recipe shows you how to cook a ham on your pellet-smoker grill. This method produces an amazing glazed ham. Read the full article →

This Traeger pork chops recipe gives you the perfect way to cook a delicious pork chop with a unique smoky flavor. Read the full article →

This crock pot crack chicken recipe is a dish your family will flip over. You'll love how easy it is to make slow cooker crack chicken for dinner. Read the full article →

This smoked Traeger brisket recipe results in tender BBQ meat. This Traeger brisket recipe is simple and takes only 30 minutes to prep. Read the full article →

This easy smoked chicken drumsticks recipe is made with a sweet BBQ chicken rub. Enjoy this chicken legs recipe with your favorite BBQ sauce. Read the full article →

It's easy to make smoked mac and cheese on your Traeger smoker grill. Creamy and oh-so-delicious, it's the ultimate comfort food. Read the full article →

This Alabama white sauce recipe is one of the classic BBQ sauces. Serve it with chicken, fish, and pork. A quick and easy sauce to make. Read the full article →

This best smoked chicken thighs recipe is tasty and simple to make. Cook up these competition-style chicken thighs for dinner or a cookout. Read the full article →

Need a quick and easy split pea soup recipe for dinner? This is the best split pea soup recipe that can be made in an hour. Read the full article →

This mini blueberry cheesecake cupcakes recipe is a crowd-pleaser. Blueberry cheesecake cupcakes are fun to make for parties. Read the full article →

Make this homemade crockpot spaghetti sauce recipe for weeknight dinners. This crockpot spaghetti meat sauce is a family favorite. Read the full article →